An asphalt overlay is one of the most cost-effective ways to extend the life of a commercial parking lot. Instead of tearing everything out and starting from scratch, you’re adding a new layer of hot-mix asphalt over the existing surface. When it’s done right, an overlay gives you a fresh, smooth lot that looks and performs like new, at roughly 40 to 60 percent of the cost of a full replacement.
But here’s the thing: overlays aren’t always the right move. And in Southern California, the heat, UV exposure, and soil conditions create specific challenges that affect whether an overlay will hold up for 12 to 15 years or start failing in 5.
This guide covers everything property managers and commercial property owners in the Inland Empire and greater SoCal need to know about asphalt overlays. When they make sense, when they don’t, what the process looks like, and how to get the most out of the investment.
What Is an Asphalt Overlay?
An asphalt overlay (sometimes called a resurfacing) is exactly what it sounds like. A new layer of asphalt, typically 1.5 to 3 inches thick, is placed directly on top of the existing pavement. The old surface acts as the base, and the new material gives you a fresh driving and parking surface.
It’s different from a full-depth replacement, where the entire pavement structure, including the base and subgrade, gets torn out and rebuilt. And it’s different from patching, which addresses isolated problem areas without resurfacing the whole lot.
Most commercial overlays in Southern California use a standard hot-mix asphalt (HMA). The asphalt is produced at a plant, trucked to the site hot (around 300 degrees), spread by a paving machine, and compacted with rollers before it cools. Depending on lot size, most overlays can be completed in one to three days, and traffic can drive on the new surface within 24 to 48 hours.
Overlay vs. Full Replacement vs. Mill-and-Overlay: Which Do You Actually Need?
This is the first question any property manager should be asking. Choosing the wrong approach either wastes money or doesn’t fix the real problem. Here’s how the three main options compare.
| Overlay | Mill-and-Overlay | Full Replacement | |
| What it is | New asphalt layer placed on top of existing surface | Old surface milled down 1-2″, then new asphalt placed | Entire pavement structure torn out and rebuilt |
| Best when | Surface wear only. Base is solid. Drainage is good. | Surface damage with some cracking. Base mostly sound. Need to maintain curb heights. | Base failure, widespread alligator cracking, drainage problems, structural issues. |
| Approx. cost | $2 to $5 per sq ft | $3 to $7 per sq ft | $6 to $12+ per sq ft |
| Downtime | 1-2 days | 2-3 days | 1-3 weeks |
| Lifespan (SoCal) | 10-15 years with maintenance | 12-18 years with maintenance | 15-25 years with maintenance |
The critical distinction: an overlay only works if the existing base is structurally sound. If you put new asphalt on top of a failed base, the cracks and depressions will reflect through the new surface within a couple of years. You’ll have spent the money and still end up with a lot that’s failing.
When a Mill-and-Overlay Is the Better Choice
Milling removes the damaged top layer before the new asphalt goes down. This does two important things. First, it creates a clean bonding surface so the new asphalt adheres properly. Second, it keeps the finished surface at the right elevation relative to curbs, drainage inlets, and ADA ramps. In most commercial lots, a straight overlay without milling raises the surface by 1.5 to 3 inches. That can create problems at every transition point.
For most Inland Empire parking lots that are 10 to 15 years old with moderate surface damage but a solid base, mill-and-overlay is the approach that gives you the best long-term result per dollar spent.
How to Tell If Your Parking Lot Is a Good Candidate for an Overlay
Not every lot qualifies for an overlay. Here’s what to evaluate.
Signs Your Lot Is a Good Overlay Candidate
- Surface cracking that hasn’t penetrated to the base layer (hairline cracks, minor linear cracks)
- Faded, oxidized surface that’s lost its sealcoat protection but isn’t structurally compromised
- Minor rutting in drive aisles from normal vehicle traffic
- The lot is 8 to 15 years old and was originally installed with a proper base
- No significant drainage problems or standing water
Signs Your Lot Needs More Than an Overlay
- Alligator cracking in large sections (this almost always means the base has failed)
- Potholes that keep returning after patching
- Standing water that doesn’t drain within 24 hours
- Visible sinking or heaving, especially near utility trenches or building foundations
- The lot has already been overlaid once or twice (adding more layers creates diminishing returns and elevation issues)
A qualified contractor can core-sample the existing pavement to check the base condition. That’s the only way to know for certain whether an overlay will hold. Skipping that step is how property managers end up paying for a resurfacing that fails in three years.
Southern California-Specific Factors That Affect Overlay Performance
Overlay work in the Inland Empire isn’t the same as overlay work in the Pacific Northwest or the Midwest. Several regional factors directly influence how long your overlay will last and how it should be specified.
Heat and UV Exposure
This is the biggest factor. Inland Empire summers regularly push air temperatures above 100 degrees, and pavement surface temps can exceed 150. For asphalt overlays, this matters in two ways.
During installation, high ambient temps mean the asphalt stays workable longer, which can be an advantage for achieving proper compaction. But if it’s too hot, the surface can become soft and prone to scuffing from vehicle tires before it fully cures.
Over time, UV exposure oxidizes the binder in the new surface layer just like it does with any asphalt. An overlay without sealcoating protection will start to oxidize within two to three years in this climate. That means the maintenance clock starts ticking the moment the overlay is placed.
Thermal Cycling
Daily temperature swings in the IE are extreme. It’s not unusual to see 60 degrees at dawn and 110 by mid-afternoon, a 50-degree swing in a single day. That constant expansion and contraction stresses the bond between the new overlay and the existing surface. If the tack coat (the adhesive layer between old and new asphalt) wasn’t applied correctly, thermal cycling will cause delamination, where the new layer separates from the old one.
Soil Conditions
The Inland Empire has a mix of soil types, but expansive clay soils are common in areas like Moreno Valley, Perris, and the southern end of the San Bernardino Valley. These soils swell when they absorb moisture and shrink during dry periods. That movement translates to the pavement above. An overlay on top of a base that’s already shifting with the soil will crack faster than one on stable, well-compacted ground.
Sandy soils in other parts of the region present different challenges. They drain quickly but can shift under load if the aggregate base isn’t deep enough. Either way, soil conditions should inform the overlay specification, not just the surface condition.
Limited Freeze-Thaw, but Don’t Ignore Winter
Southern California doesn’t deal with the freeze-thaw cycles that destroy pavement in the Midwest and Northeast. But higher elevation areas in the IE, like parts of Rancho Cucamonga near the foothills and the Cajon Pass corridor, can see overnight temperatures dip below freezing in December and January. If water has infiltrated cracks in the existing pavement before an overlay, that water can freeze and expand, compromising the bond. Pre-overlay repairs should account for this in those areas.
The Overlay Process: What to Expect Step by Step
Understanding the process helps you evaluate whether a contractor is doing the job right. Here’s what a properly executed commercial parking lot overlay looks like in Southern California.
Step 1: Assessment and Core Sampling
Before any work starts, the contractor should walk the lot and identify all areas of concern. Core samples (cylindrical sections cut from the pavement) should be taken to verify the thickness of the existing asphalt and the condition of the base underneath. This is where the overlay vs. replacement decision gets made.
Step 2: Pre-Overlay Repairs
Any sections with base failure need to be addressed before the overlay goes down. This means sawcutting and removing the damaged section, recompacting or replacing the base material, and installing a full-depth asphalt patch. Cracks wider than a quarter inch should be routed and sealed. Failing to do pre-overlay repairs is the most common reason overlays fail early.
Step 3: Milling (If Applicable)
If the project is a mill-and-overlay, the milling machine removes the specified depth (usually 1 to 2 inches) from the existing surface. The milled material (called RAP, or reclaimed asphalt pavement) is loaded into trucks and recycled. Milling leaves a rough, grooved surface that’s ideal for bonding with new asphalt.
Step 4: Tack Coat Application
This is the step most people never think about, but it’s critical. A tack coat is a thin layer of asphalt emulsion sprayed onto the existing (or milled) surface before the new asphalt is placed. It acts as glue between the old and new layers. In Southern California’s heat, the tack coat needs to be applied at the right rate and allowed to “break” (turn from brown to black) before paving begins. Too much tack coat creates a slip plane. Too little means the layers won’t bond.
Step 5: Asphalt Placement
The new hot-mix asphalt arrives from the plant at approximately 300 degrees and is placed by a paving machine in a continuous, even layer. The paver is followed immediately by rollers that compact the asphalt to the specified density. Proper compaction is essential. Under-compacted asphalt has air voids that let water in and accelerate deterioration. Over-compacted asphalt can crack.
In the IE, paving is typically scheduled for early morning starts, especially during summer months. The goal is to get the asphalt placed and compacted before mid-afternoon, when surface temperatures peak and can interfere with proper cooling and curing.
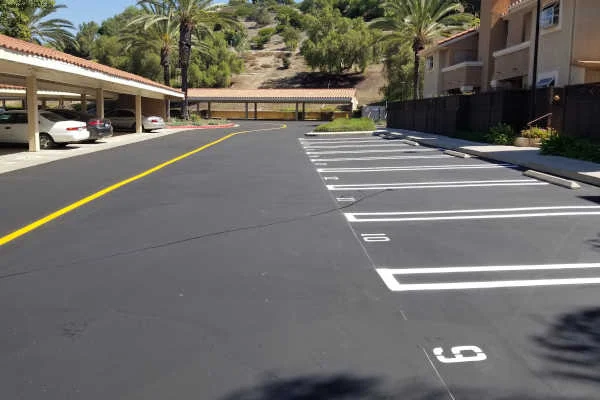
Step 6: Striping and Finishing
After the overlay cures (usually 24 to 48 hours), the lot gets re-striped. This includes parking stalls, directional arrows, fire lanes, handicap markings, and any ADA-required signage or curb ramp adjustments. If the overlay changed surface elevations, ADA transitions and drainage inlet heights may need to be adjusted.
How Thick Should Your Overlay Be?
Thickness matters. It’s not just about cost savings. The right thickness depends on what the lot is being used for.
| Lot Usage | Recommended Overlay Thickness | Why |
| Standard passenger vehicle parking | 1.5 to 2 inches | Sufficient for car traffic if base is solid |
| Mixed traffic (cars + occasional delivery trucks) | 2 to 2.5 inches | Handles heavier point loads without rutting |
| Heavy vehicle areas (loading docks, dumpster pads, bus routes) | 2.5 to 3+ inches (or consider concrete) | Prevents premature rutting and base compression |
In areas with regular heavy truck traffic, an overlay alone may not be the best solution. Concrete aprons at loading zones and dumpster pads often make more sense than thicker asphalt, because concrete handles sustained heavy loads without deforming.
Timing Your Overlay: The Best Months in Southern California
Asphalt paving has an ideal temperature window. Air temperatures should be above 50 degrees and ideally below 95 degrees. The surface you’re paving on should not be too hot (which prevents proper bonding) or too cold (which cools the asphalt too quickly).
In the Inland Empire, the best months for overlay work are typically March through mid-June, and then again from late September through November. During peak summer (July through early September), paving is still possible, but crews need to start early in the morning and manage material temperatures carefully. The extreme heat can also cause issues with tack coat application and curing.
The practical reality: most property managers wait until damage is visible, which usually means they’re trying to schedule work during the busiest season. Planning ahead and booking overlay work in spring gives you better scheduling flexibility, better installation conditions, and usually better pricing from contractors who aren’t fully booked yet.
Common Overlay Mistakes That Shorten Pavement Life
We see the same mistakes on lots across the region. Avoiding them is the difference between an overlay that lasts 12 to 15 years and one that starts failing in 3 to 5.
Overlaying a Failed Base
This is mistake number one. If the base has failed (you’ll see alligator cracking, potholes that keep coming back, or sections that feel spongy when you walk on them), an overlay will not fix it. The cracks will reflect through the new surface, usually within one to two seasons. Those areas need full-depth repair before the overlay goes down.
Skipping the Tack Coat or Applying It Wrong
Without proper tack coat, the new asphalt layer sits on top of the old one without bonding to it. In the IE’s thermal cycling environment, that means the layers will separate. You’ll see chunks of the overlay lifting off, especially at edges and around drainage inlets.
Ignoring Drainage
An overlay raises the surface elevation. If the lot already had marginal drainage, adding 1.5 to 2 inches of asphalt can redirect water toward buildings, block drain inlets, or create new low spots where water pools. Drainage should be assessed and corrected before or during the overlay, not after tenants start complaining about flooding.
Overlaying Too Many Times
Every overlay adds height. After two overlays, you’re adding 3 to 6 inches to the original surface. Curbs become too short. Drainage changes direction. ADA ramp slopes go out of compliance. As a general rule, a parking lot can handle one, maybe two overlays over its life before a full removal and replacement is needed.
No Maintenance Plan After the Overlay
A fresh overlay is not maintenance-free. Within two to three years in Southern California, the new surface needs sealcoating to protect it from UV oxidation. Cracks that appear should be sealed promptly. Property managers who treat an overlay as “done and forget” cut its useful life nearly in half.
Post-Overlay Maintenance: Protecting Your Investment
The overlay is the starting point, not the finish line. Here’s a practical maintenance timeline for a newly overlaid parking lot in Southern California.
Year 1
Let the overlay cure fully. Avoid any sealcoating for at least 6 to 12 months. The new asphalt needs time for the binder oils to evaporate and the surface to harden. During this period, keep the lot clean and address any drainage issues that show up after the first rains.
Year 2 to 3
Apply the first sealcoat. This is the most important maintenance step you’ll take. Sealcoating blocks UV rays, slows oxidation, and creates a protective layer against fuel spills, oil, and water penetration. In the IE’s climate, this first application sets the pace for the pavement’s long-term performance.
Every 2 to 3 Years After That
Re-apply sealcoat on a regular cycle. Between sealcoat applications, seal any cracks that appear. Even small cracks let water into the base, and that’s how overlay failure starts. The cost of crack sealing is minimal compared to the damage unchecked moisture causes.
Year 8 to 12
Schedule a professional assessment. By this point, the overlay will be showing wear. Some areas may need spot repairs or patching. A contractor who knows the original installation can evaluate whether the lot needs targeted repairs or whether it’s approaching the end of its overlay life.
How Much Does a Parking Lot Overlay Cost in Southern California?
Cost depends on lot size, condition, and scope of pre-overlay work. Here are realistic ranges for commercial parking lots in the Inland Empire.
| Project Component | Typical Cost Range |
| Overlay only (1.5-2″ HMA) | $2 to $5 per sq ft |
| Mill-and-overlay (1-2″ mill + 2″ HMA) | $3 to $7 per sq ft |
| Pre-overlay patching (full-depth, per sq ft of patched area) | $8 to $15 per sq ft |
| Striping (full lot) | $0.15 to $0.50 per linear ft |
| ADA ramp adjustments | $1,500 to $4,000 per ramp |
For a typical 50,000-square-foot commercial parking lot with moderate surface damage, a mill-and-overlay with some patching, striping, and minor ADA work usually falls in the $150,000 to $350,000 range. That’s roughly half of what a full removal and replacement would cost for the same lot.
The long-term math is what matters. An overlay that costs $200,000 and lasts 15 years with proper maintenance is a better investment than a $100,000 overlay that fails in 5 years because the base wasn’t repaired or the maintenance was skipped.
What to Look for in an Overlay Contractor
The contractor you choose determines the quality of the overlay. Here’s what to evaluate.
- Do they core-sample before quoting? Any contractor who gives you a price without checking the base condition is guessing. Core samples are non-negotiable for a proper overlay quote.
- Do they address drainage? A contractor who doesn’t talk about drainage before an overlay is missing a critical step. Drainage issues need to be resolved before or during the overlay, not after.
- Do they handle pre-overlay repairs? Some contractors will overlay and leave the patching to someone else. That means nobody is accountable for the result. You want a contractor who handles the entire scope.
- Are they licensed and insured for commercial work in California? A C-12 Earthwork and Paving license is the standard for this type of work. Verify it through the Contractors State License Board.
- Do they work with both asphalt and concrete? Lots that need concrete in high-stress zones shouldn’t require a second contractor. A company that handles both can plan the whole project cohesively.
Plan Your Overlay the Right Way
A well-planned asphalt overlay can save your property hundreds of thousands of dollars compared to a full replacement. But the savings only hold if the work is done right: proper base evaluation, pre-overlay repairs, correct material specifications, and a maintenance plan that starts before the new surface has a chance to deteriorate.
Victory Paving works with commercial property managers across Southern California, from Riverside to Murrieta to San Bernardino to Eastvale. We’ll core-sample your lot, assess the base, identify any drainage or ADA issues, and give you a clear scope and price before any work starts. Request a free estimate or call 760-367-8047. We’ll walk your property and tell you exactly what it needs.